This guide walks you through deploying a Kubernetes Cluster on google cloud using the Google Kubernetes Engine (GKE).
About Google Kubernetes Engine
Google cloud offers its own managed Kubernetes service called Google Kubernetes Engine, also know as GKE.
Several companies use GKE for their production workload. One of the best examples would be hosting the PokemopnGo game on GKE. In fact, it is the largest GKE deployment ever.
Compared to other managed services like EKS (AWS) and AKS (Azure), GKE is relatively easy to set up and operate.
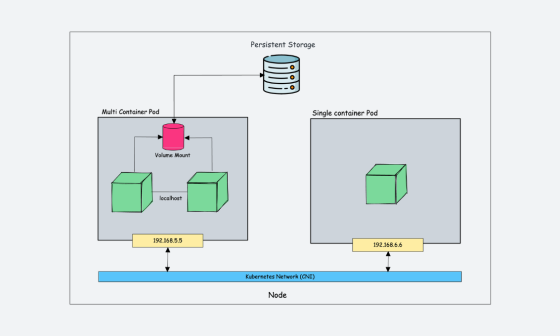
In my container orchestration platform Post, I have listed the difference between managed and self-hosted Kubernetes implementation. One main advantage of managed kubernetes clusters is the less administrative overhead.
If you use GKE you can avoid the Kubernetes administrative overhead as it is taken care of by Google cloud. You just need to focus on deploying applications on Kubernetes.
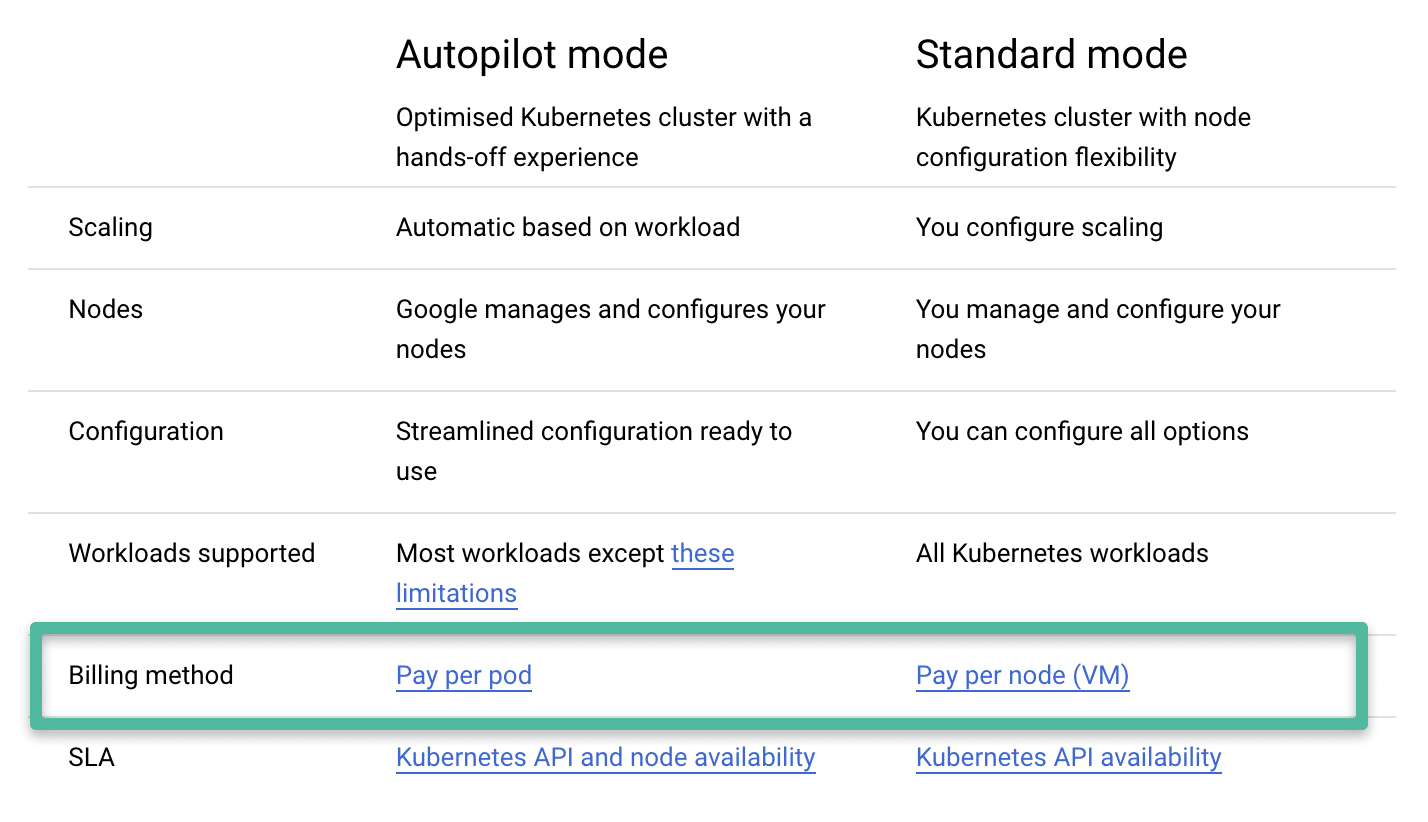
GKE has two types of clusters.
- Autopilot Cluster: All cluster infrastructure operations are taken care of by Google cloud. You just have to focus on application deployments.
- Standard Cluster: Here except for the control plane, you have to manage the underlying infrastructure (Nodes, scaling etc)
Following image shows the main difference between autopilot and standard GKE cluster.
In this blog, I will focus only on the Standard GKE cluster. To know more about GKE, there is no better place than the google cloud official GKE documentation
Create VPC With GKE Subnet & Secondary IP Ranges
Note: Ensure you have the IAM admin permissions to create the network, GKE cluster, and associated components.
You can create the GKE cluster in the default VPC provided by Google cloud. However, for learning and better understanding, lets create our own VPC.
Normally, when we deploy non-containerized workloads on VPC, we would just create subnets with primarry IP ranges.
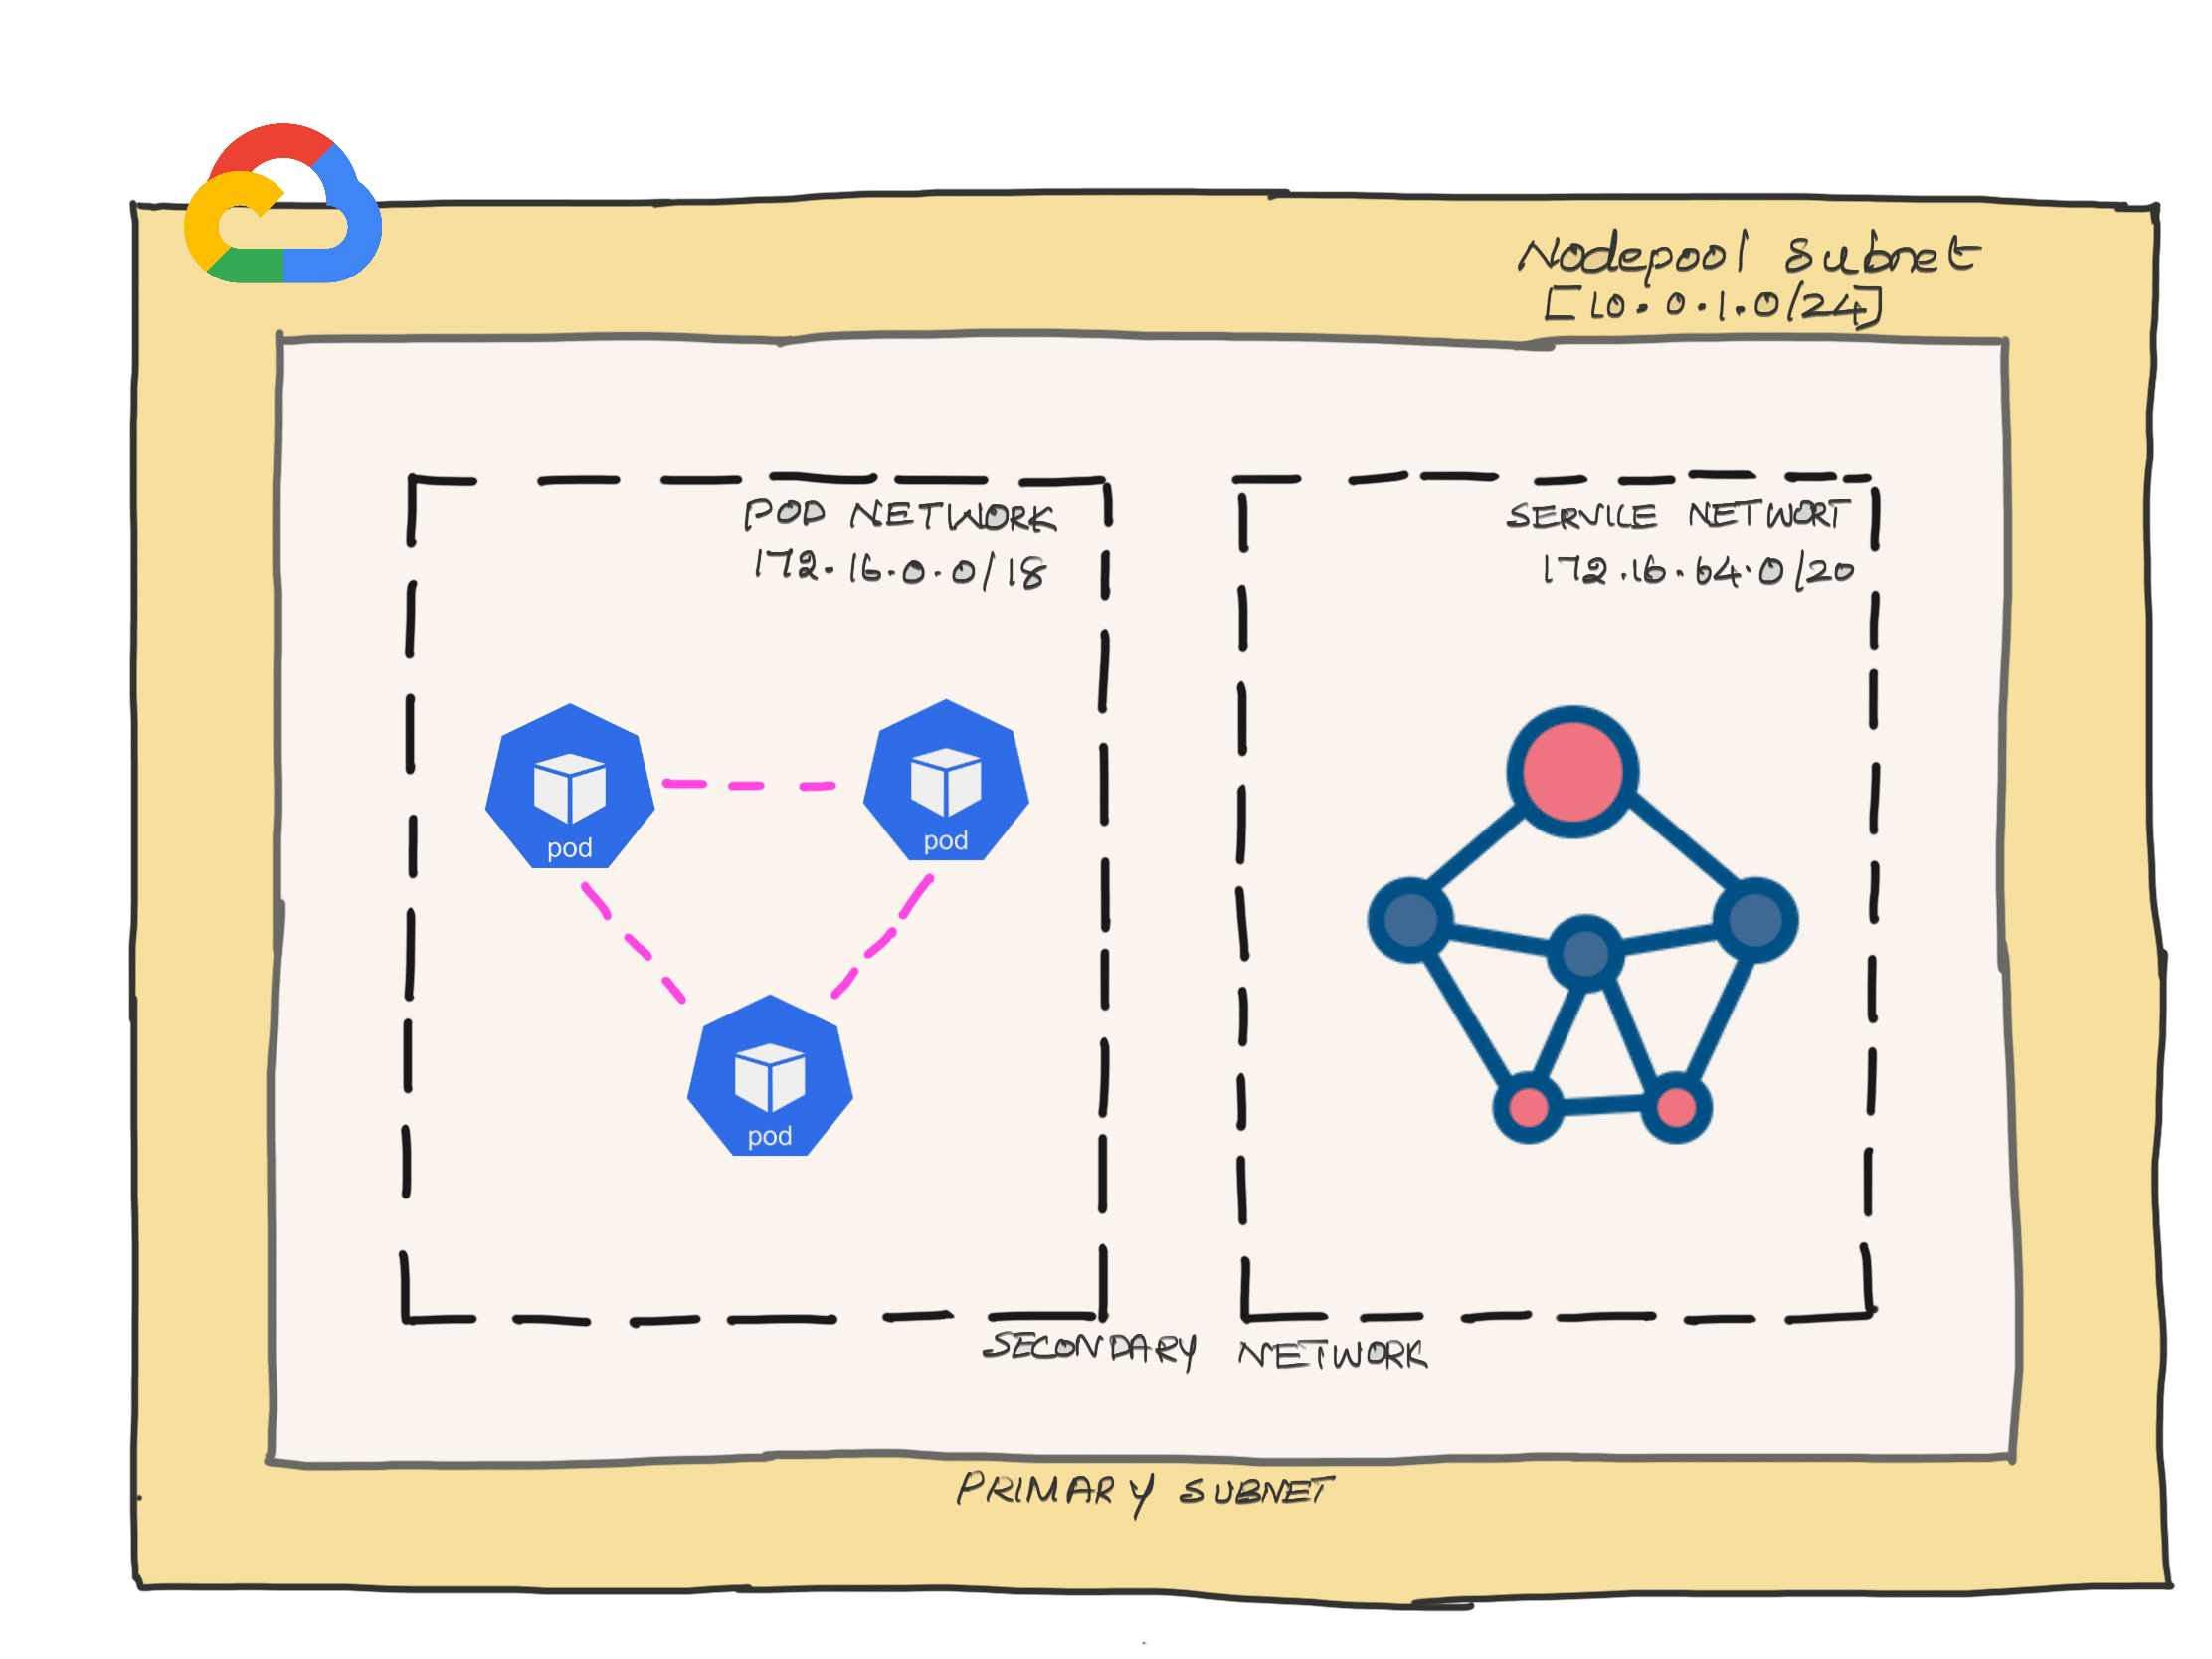
When it comes to the GKE cluster, we need to create a subnet to host the cluster nodes, and secondary IP ranges under the subnet for the kubernetes pod and service network. In google cloud term; it is called VPC native clusters.
So, lets plan for nework for the following requirements.
| Cluster Requirements | Calculated IP ranges |
| The cluster should accommodate 200 Nodes. (Primary Subnet) | This means we need a subnet with a minimum of 254 IP addresses. That is 10.0.1.0/24 |
| Each node should accommodate 75 pods (Secondary range – Pod network) | 200×75 = 15000 . So we will /18 secondary range that would give 16384 IP addresses. 172.16.0.0/18 (172.16.0.0 – 172.16.63.255) |
| The cluster should support 2000 services. Secondary range – Service network) | This means we need a /21 range for the service network. Assuming we continue from the pod range, it would be be 172.16.64.0/20 (172.16.64.0 – 172.16.79.255) |
Finally we have arrived to the following network ranges.
- Primary subnet (For Cluster Nodes) – 10.0.1.0/24
- Secondary network (For pods) – 172.16.0.0/18
- Secondary network (For services) – 172.16.64.0/20
So here is what we are going to do.
- Create a VPC
- Add a subnet with pod and service secondary range networks.
Now that we have finalized the network ranges let’s create a VPC network. I am calling network name as gke-network
gcloud compute networks create gke-network --subnet-mode=customCreate a subnet named gke-subnet-a with two secondary ranges named pod-network & service-network
gcloud compute networks subnets create gke-subnet-a \
    --network gke-network \
    --region us-central1 \
    --range 10.0.1.0/24 \
    --secondary-range pod-network=172.16.0.0/18,service-network=172.16.64.0/20
By default the subnet creates a routed to the internet gateway. So you dont have to do anything to enable internet access for the nodes.
However, we need to add custom firewall rules to access the nodes from outside the VPC network.
Note: When running production workloads, careful consideration has been given to the network design by keeping the subnets fully private without internet gateways.
Now we have the necessary network infrastructure to deploy a public GKE cluster.
Setting Up Kubernetes Cluster On Google Cloud
Note: If you are looking for a self-hosted test/POC kubernetes cluster setup on google cloud, you can use Kubeadm to quickly configure it. Refer to my Kubeadm cluster setup guide for setting up one master node and multi worker node Kubernetes setup.
There are two types of standard GKE cluster.
- Public GKE cluster: Control plane node is publicly accessible, and all the worker nodes have a public interface attached to them. Here the cluster is secured using firewall rules and whitelisting only approved IP ranges to connect to the cluster API. This reduces the attack surface. The public clusters are normally not part of an organization’s hybrid network due to the fact that the nodes have a public interface.
- Private GKE Cluster: The control plan and worker nodes get deployed in a predefined VPC network range defined by the user. The access to the cluster components will be completely private through VPC networks. Even though the control plane gets launched in the CIDR given by the user, that VPC gets created and managed by google cloud. We can only control the worker node subnets.
This tutorial will guide you through the steps for setting up a highly available multi-zone public kubernetes cluster.
Prerequitests
- You should have
gcloudconfigured from the machine you are trying to set up the cluster. Refer to google cloud SDK setup guide to configure gcloud - If you are using google cloud servers, gcloud is available by default. You should have the admin service account attached to the server for provisioning GKE services.
GKE Cluster Creation Using gcloud CLI
Step 1: We will use the gcloud CLI to launch a regional multi-zone cluster.
In our setup, we will be doing the following.
- Spin up the cluster in
us-central1the region with one instance per zone (total three zones) usingg1-small(1.7GB) machine type with autoscaling enabled. - Preemptible VMs with autoscaling to a maximum of three-node per to reduce the cost of the cluster.
- Cluster gets deployed with custom VPC, subnets & secondary ranges we created in the previous section.
- Enable the master authorized network to allow only whitelisted IP ranges to connect to the master API. I have given 0.0.0.0/0, you can replace this with your IP address.
- Add a network tag named “
webapps” to add a custom firewall rule to the GKE cluster nodes for testing purposes.
Note: When deploying a cluster in production, more configurations need to be considered for the network and the cluster. It depends on the organizational policy and project requirements.
Now, lets create the cluster using the following command.
gcloud container clusters create demo-gke \
      --region us-central1 \
      --no-enable-ip-alias \
      --node-locations us-central1-a,us-central1-b,us-central1-c \
      --num-nodes 1 \
      --enable-autoscaling \
      --min-nodes 1 \
      --max-nodes 3 \
      --node-labels=env=dev \
      --machine-type g1-small \
      --enable-autorepair  \
      --node-labels=type=webapps \
      --enable-vertical-pod-autoscaling \
      --preemptible \
      --disk-type pd-standard \
      --disk-size 50 \
      --enable-ip-alias \
      --network gke-network \
      --subnetwork gke-subnet-a \
      --cluster-secondary-range-name pod-network \
      --services-secondary-range-name service-network \
      --tags=webapp \
      --enable-master-authorized-networks \
      --master-authorized-networks=0.0.0.0/0
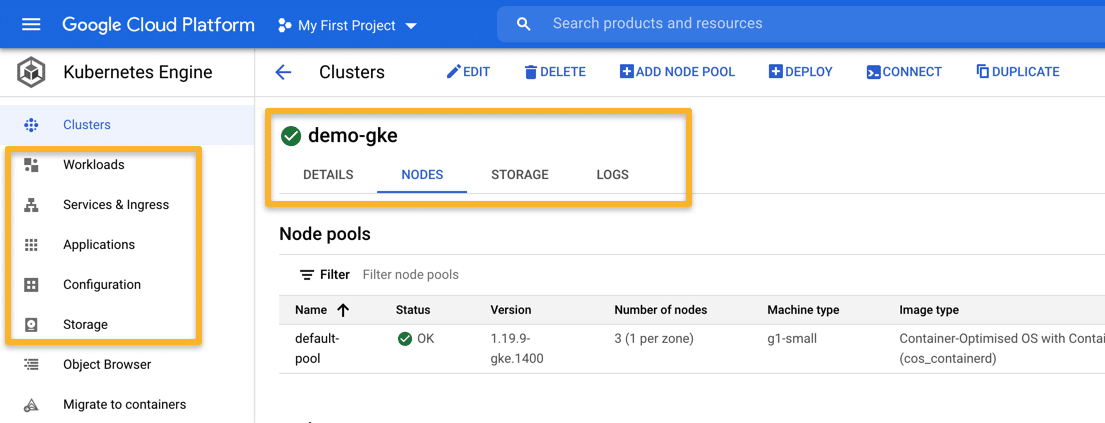
On a successful execution, you will see the cluster details in the output as shown below.

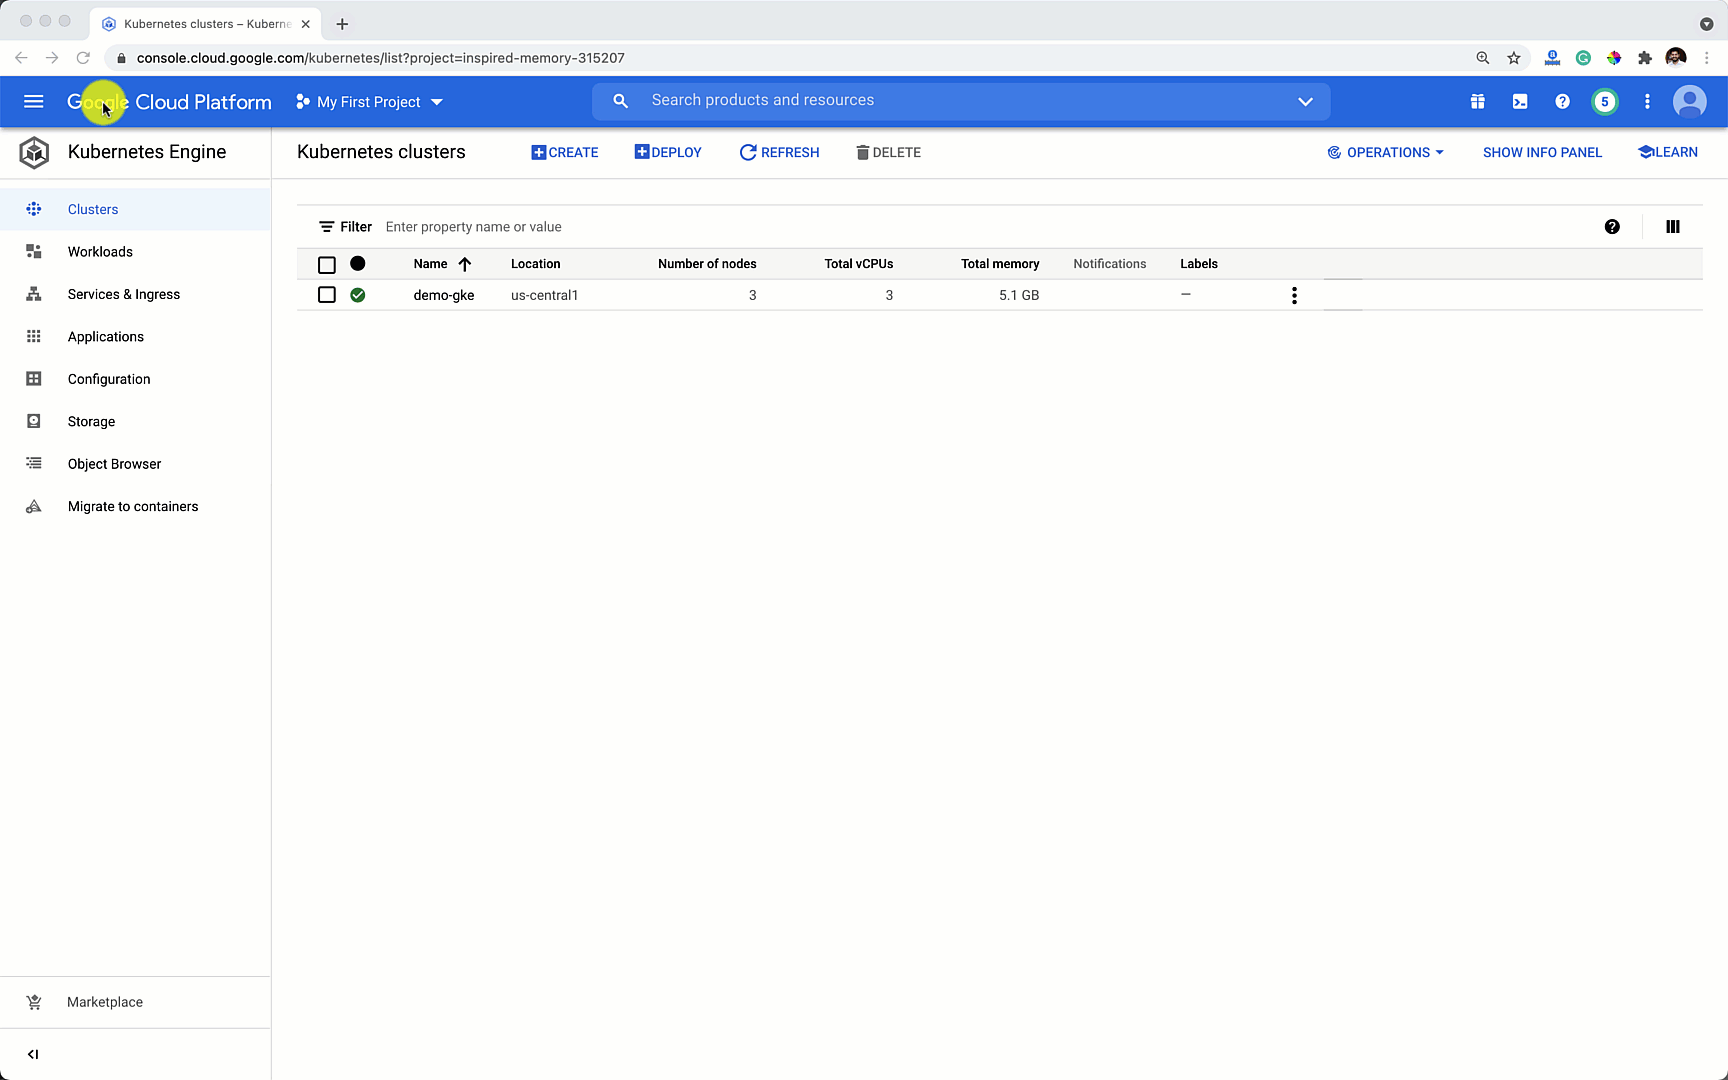
Also, you check the google kubernetes engine dashboard to view all the details about the cluster.
Step 2: You can get all the information about the GKE cluster using the following command.
gcloud container clusters describe demo-gke --region=us-central1
Step 3: Now, we need to download the cluster kubeconfig to our location workstation.
The following command generates the kubeconfig and adds it to the ~/.kube/config file.
gcloud container clusters get-credentials demo-gke --region=us-central1You can also get the connect command from the GKE GUI.
gcloud Kubectl Component Installation
Kubectl is a command-line utility for interacting with the kubernetes cluster. You can get more information about kubectl from here
If you already have kubectl in your workstation, you can ignore this step.
To install kubectl component, execute the following gcloud command.
gcloud components install kubectl
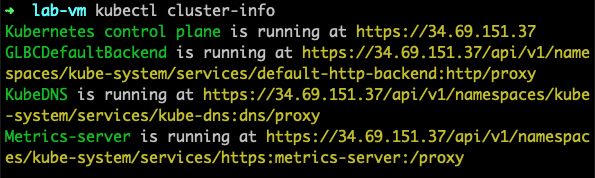
Now, you can get your cluster information using the kubectl command using the following command.
kubectl cluster-info
The output would look like the following.
Deploy Nginx on GKE for Validation
Let’s deploy a sample Nginx application in a custom namespace to validate the cluster.
Step 1: Create a namespace named demo
kubectl create namespace demoStep 2: Let’s deploy a sample Nginx app in the demo namespace. Also, create a Nodeport service for testing purposes.
Copy the following and execute directly on the terminal.
cat <<EOF | kubectl apply -f -
---
apiVersion: apps/v1
kind: Deployment
metadata:
  name: nginx-deployment
  namespace: demo
spec:
  selector:
    matchLabels:
      app: nginx
  replicas: 2
  template:
    metadata:
      labels:
        app: nginx
    spec:
      containers:
      - name: nginx
        image: nginx:latest
        ports:
        - containerPort: 80
---
apiVersion: v1
kind: Service
metadata:
  name: nginx-service
  namespace: demo
spec:
  selector:
    app: nginx
  type: NodePort
  ports:
    - port: 80
      targetPort: 80
      nodePort: 32000
EOF
Lets check the deployment status.
kubectl get deployments -n demoAlso lets describe the service and check the nodePort details.
kubectl describe svc nginx-service -n demoStep 3: Now to access the application on node port 32000, you need to add an ingress firewall rule to allow traffic on port 32000 from the internet.
This rule is applicable for all instances with gke-webapps tag in gke-network
gcloud compute firewall-rules create gke-webapps \
    --network=gke-network \
    --allow=tcp:32000 \
    --description="Allow incoming traffic on TCP port 32000" \
    --direction=INGRESS \
    --source-ranges="0.0.0.0/0" \
    --target-tags="gke-webapps"
For demonstration purposes, I am adding 0.0.0.0/0 as the source IP range. Meaning, allow traffic from anywhere on the internet.
You can get your public IP by a simple google search and add it as a source instead of 0.0.0.0/0
For example, 53.45.78.32/32 as shown below.

We deployed the cluster with a network tag named “gke-webapps“. So we need to add a firewall rule that applies to the gke-webapps tag. The rule gets applied to all the cluster instances as it has the gke-webapps tag attached to it.
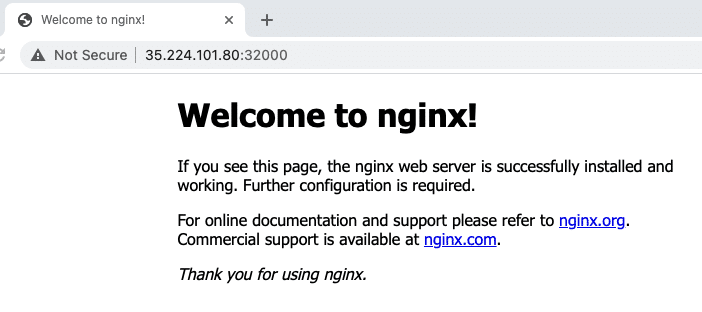
Step 5: Now that we have added the rule, lets try accessing the Nginx app using a nodes IP.
The following command will list all GKE nodes with their public IP address. Grab one IP and try accessing port 32000 and see if you can access the Nginx page.
gcloud compute instances list --filter="name~'gke-demo-*'"
For example, http://35.224.101.80:32000/
You should see the Nginx page.
Expose Nginx as a Loadbalancer Service
The same deployment can be exposed as a Loadbalancer by modifying the NodePort to Loadbalancer in the service file. GKE will create a Loadbancer that points to the Nginx service endpoint.
apiVersion: v1
kind: Service
metadata:
  name: nginx-service
  namespace: demo
spec:
  selector:
    app: nginx
  type: LoadBalancer
  ports:
    - port: 80
      targetPort: 80
Accessing Kubernetes Objects From GKE Dashboard
Kubernetes dashboard is not part of the default GKE setup. The dashboard addon is depricated.
However, there is a workload explorer in the Kubernetes engine dashboard. You can browse all the cluster objects from the dashboard.
I have recorded a small demo in the following gif file. Take a look.
GKE Cluster Logging & Monitoring
By default GKE pushes all the logs to its Stackdriver logging and monitoring systems.
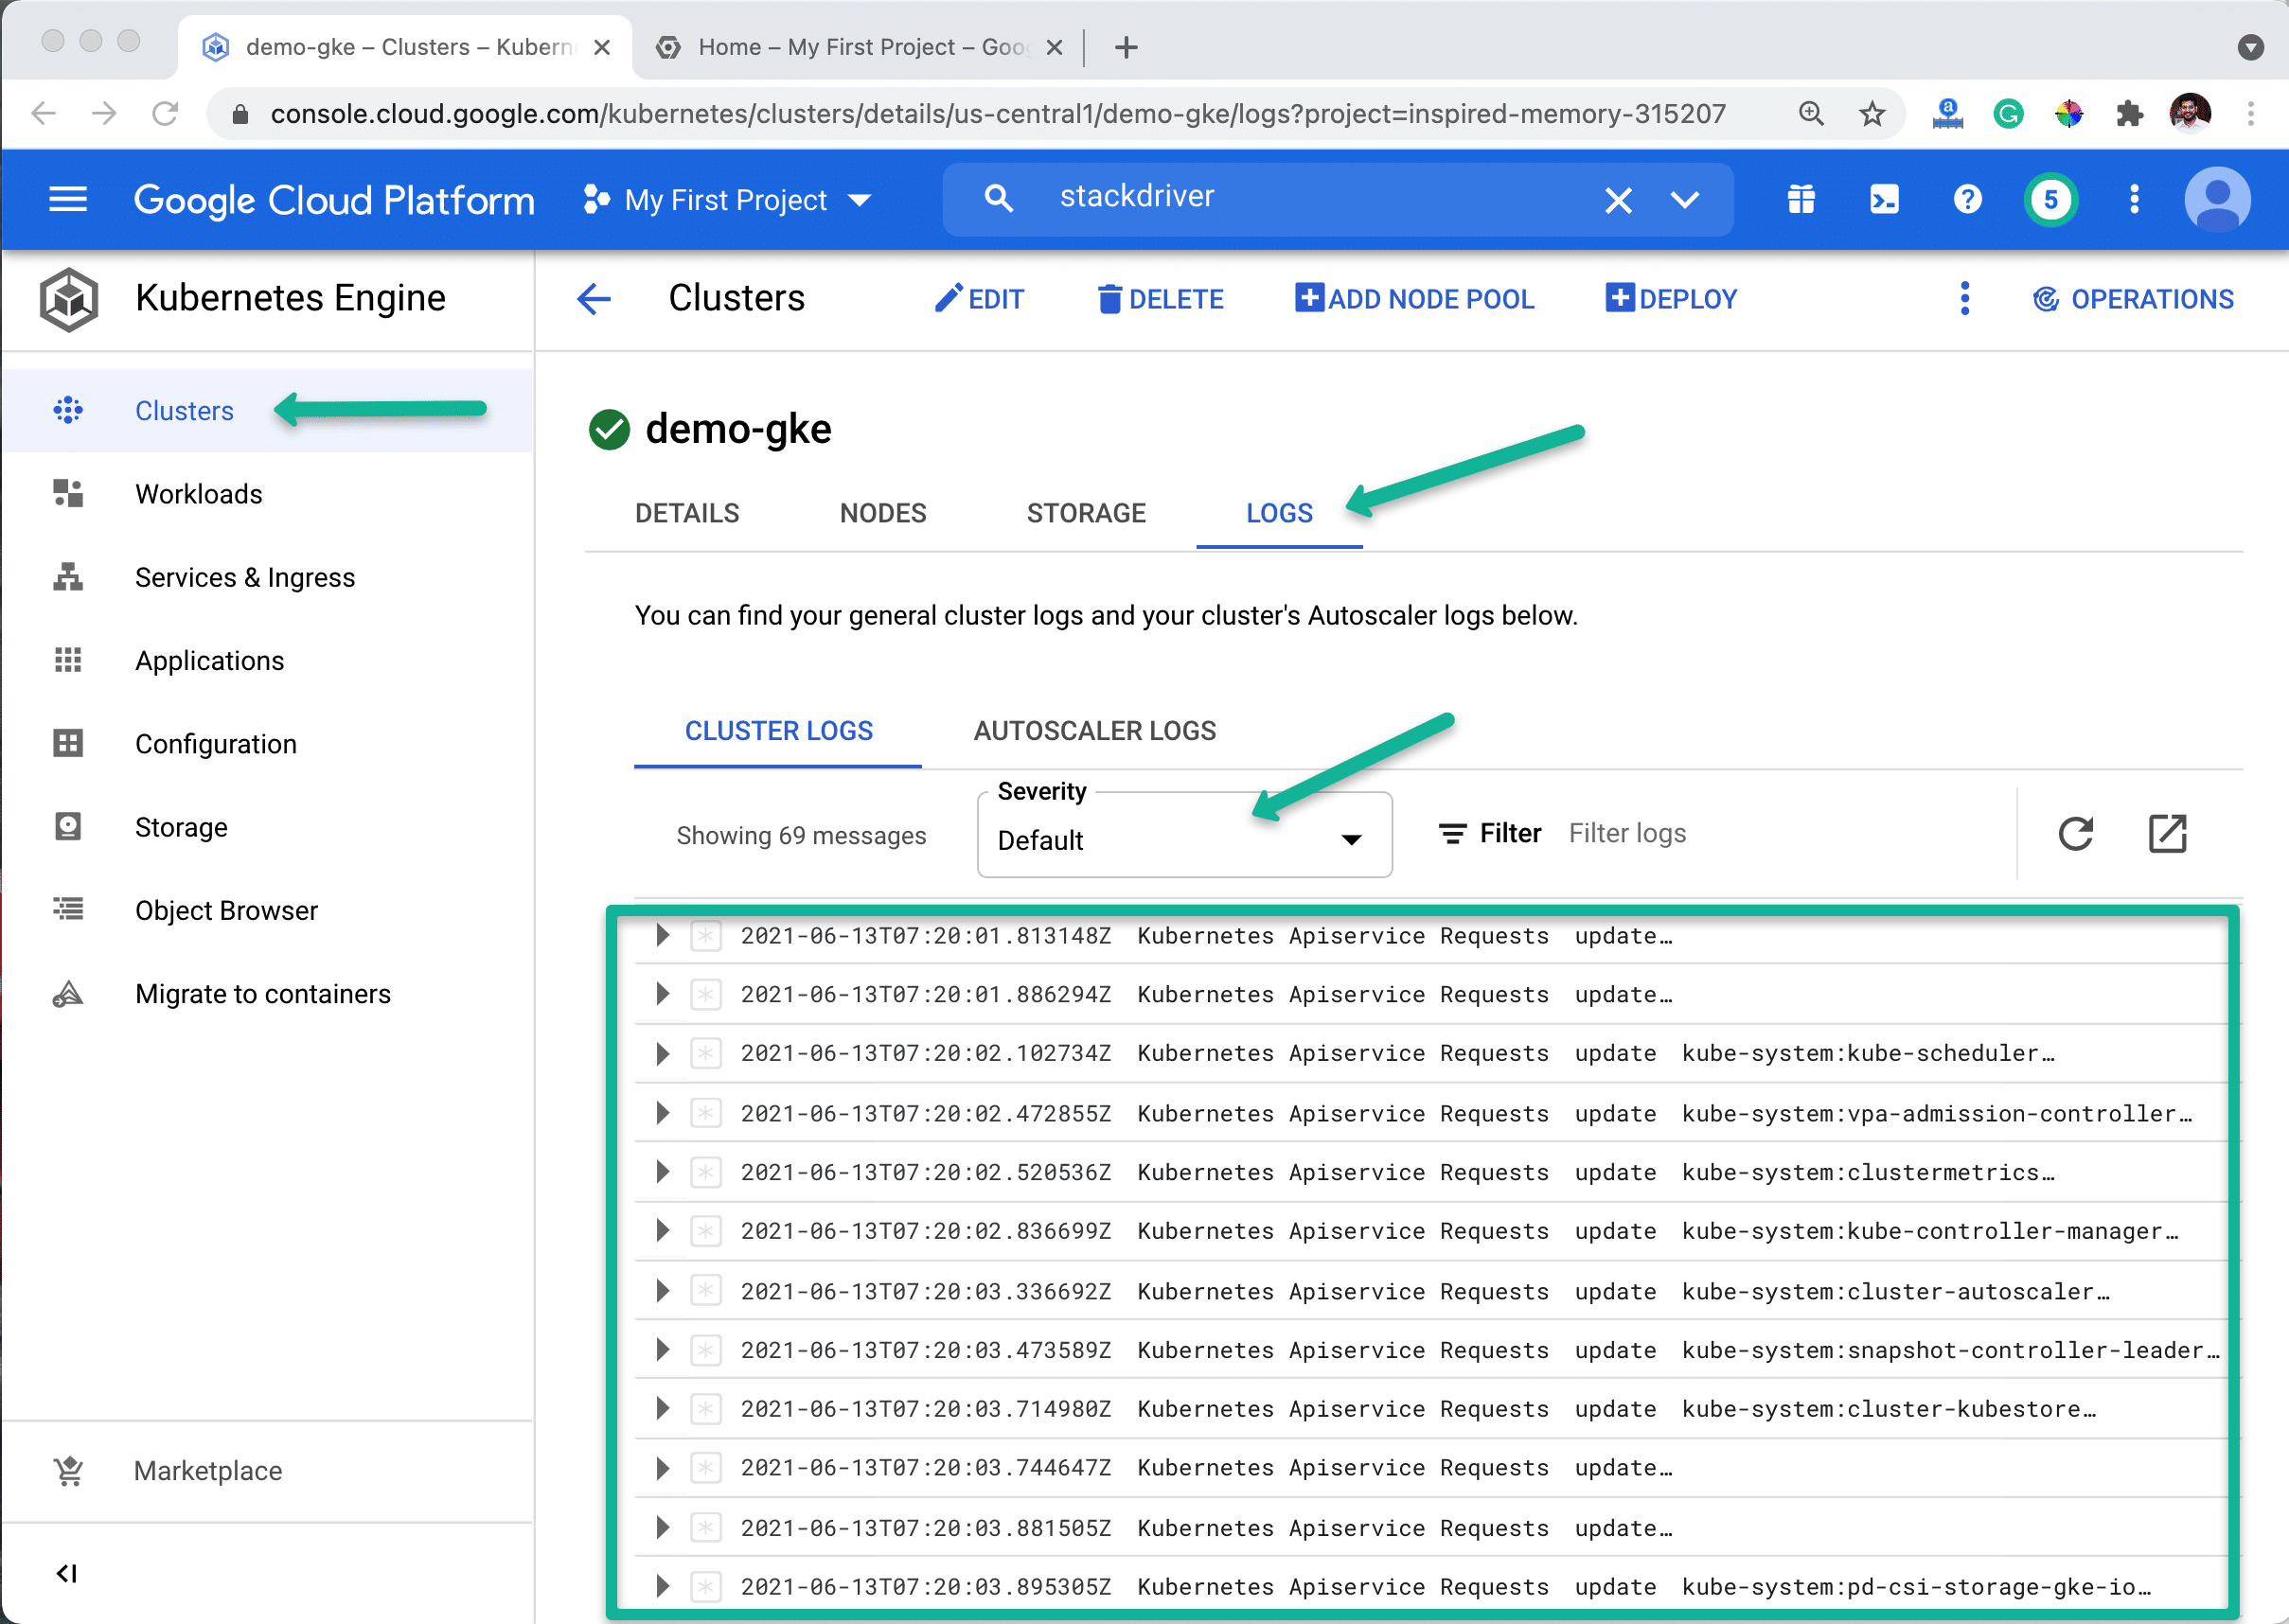
You can check the cluster logs from the Kubernetes engine dashboard.
From the monitoring dashboard you can create alerts based on the metrics generated from the cluster.
Note: When it comes to production level logging, organizations push the logs to central logging systems like Splunk through pub-sub. And tools like Prometheus are used to collect all the cluster resource metrics (Nodes, pods, etc.)
Troubleshooting GKE Nodes
If you use the default container optimized OS (COS) for the GKE cluster, there are only a limited utilities for troubleshooting the node issues.
Also, COS does not come with any package manager.
However, GKE provides a command that deploys a container in which you can install the required utilities using from the apt package manager.
Here is what you need to do. Login to a GKE node.
Execute the following command. It will automatically log in to a toolbox container with root privileges.
toolboxThen, you can install required troubleshooting utilities and carry on with the node troubleshooting.
Delete GKE Cluster
If you want to delete the GKE cluster, use the following command.
gcloud container clusters delete demo-gke --region us-central1 --quietAlso, to remove the firewall rule, execute the following command.
gcloud compute firewall-rules delete gke-webapps --quietConclusion
Setting up a Kubernetes cluster on google cloud is an easy task.
However, many configurations need to be considered for production setup from a security, scalability, and network standpoint.
Refer to the Kubernetes design consideration blog for some standard design recommendations.
If you have any questions, let me know in the comments.