In this blog, you will learn to create Dockerfile using Docker built-in command docker init. We will also look at practical examples of Dockerizing applications using docker init.
Are you tired of writing Dockerfiles manually?
Don’t worry, Docker has created a command-line utility tool called docker init to make the Dockerfile creating process easy.
Let’s learn all about the utility in this blog.
What is docker init?
Docker init is a command line utility that automates the creation of a Dockerfile based on the language the application is built in.
Docker init comes with Docker Desktop by default. If you have Docker Desktop version 4.19.0 or later installed in your system you can use the docker init command.
docker init command analyzes your project directory and proposes suitable configurations based on detected programming languages or frameworks in your workspace.
By running the docker init command on your project workspace, it will create the following files based on your project.
- Dockerfile : To build the docker image.
- compose.yaml: For multi container applications
- .dockerignore: File exclusions to reduce the Docker image size.
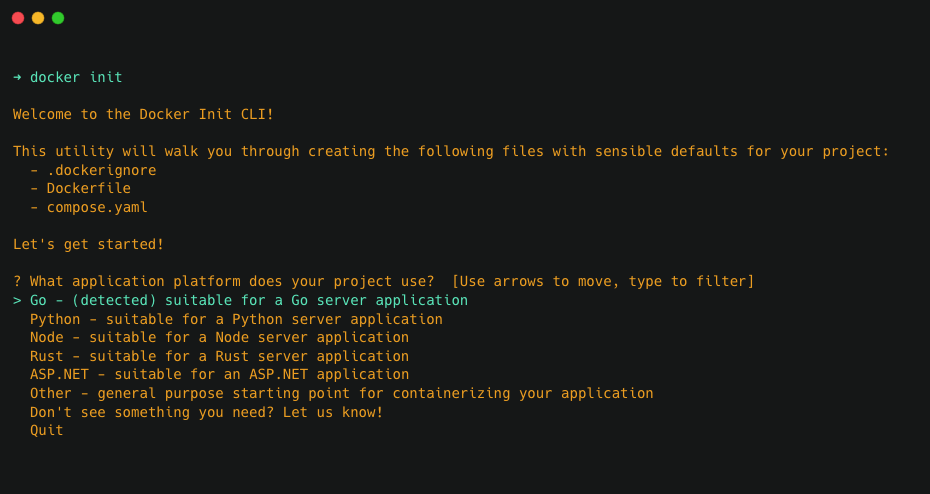
Using docker init is pretty simple. Go to your project directory and run the docker init command.
It will prompt a few questions related to your application; Once you have answered the prompts, docker init will create the files instantly.
docker init uses templates, to create Dockerfile based on the programming language you choose.
You can select the following options after running the docker init command
- GO
- Python
- Node
- Rust
- ASP.NET
- Other – Select this option if your application is not mentioned in the above options.
Even though it creates the files following all best practices, you can further customize them based on your requirements
Note: If any of these files are already present in your workspace, docker init will overwrite the files. It will ask for confirmation before overwriting the files.
Note: Dont confuse d
ocker initwithdocker-init.docker-initis a process that acts as the init process (PID 1) within a Docker container.
Docker Init Workflow
The following diagram shows the docker init workflow.

Here is how it works.
- Developer runs the docker init command inside the project directory.
- docker init then scans your project code files and prompts you with configration questions.
- Once you have answered all the promtp docker init will create the Dockerfile,
compose.yaml, and.dockerignorefiles in an instant.
How to Use Docker Init
In this section we will learn to use docker init using practical examples.
We will try hands-on examples of docker init using simple Python and Go projects.
For demonstration purposes, we are going to create a simple Hello World web application for each programming language and generate Dockerfile file using docker init.
The examples used in this guide are hosted on Github. You can clone the repository using the following command.
git clone https://github.com/techiescamp/docker-initGenerating Python Dockerfile
For Python, we are going to create a Python file for the Python Flask application, create two files app.py and requiremts.txt, and copy the below content into the files
#app.py

# app.py
from flask import Flask

app = Flask(__name__)

@app.route('/')
def hello_docker():
    return '<h1> hello world </h1'

if __name__ == '__main__':
    app.run(debug=True, host='0.0.0.0')
#requiremts.txt
flask
gunicornAs you can see the app.py file has the code for the flask application and the requiremts.txt file has the dependencies needed to run the flask application.
The dependency txt file is important because, without the dependency file, docker init will not automatically detect the language of your application.
Of course, you can also select the languages manually.
Once you have created both files, run the below init command in the same directory where the files are to start the process
docker initDocker init will check your files and ask some questions.
You can see it has automatically detected a Python-based application
Press ENTER to select Python and it will ask for the Python version, listening port, and command to run the app with suggested default values and that is so cool.
You can either select the default value by pressing ENTER or provide custom the values you want as shown in the following gif.

Once you have answered all questions docker init will create three files .dockerignore, compose.yaml, and Dockerfile as shown in the below directory structure
.
├── .dockerignore
├── Dockerfile
├── app.py
├── compose.yaml
└── requirements.txt
Here is an example of created Dockerfile. I have removed the generated comments for demo purposes.
ARG PYTHON_VERSION=3.11.6
FROM python:${PYTHON_VERSION}-slim as base

ENV PYTHONDONTWRITEBYTECODE=1
ENV PYTHONUNBUFFERED=1

WORKDIR /app

ARG UID=10001
RUN adduser \
    --disabled-password \
    --gecos "" \
    --home "/nonexistent" \
    --shell "/sbin/nologin" \
    --no-create-home \
    --uid "${UID}" \
    appuser

RUN --mount=type=cache,target=/root/.cache/pip \
    --mount=type=bind,source=requirements.txt,target=requirements.txt \
    python -m pip install -r requirements.txt

USER appuser

COPY . .

EXPOSE 8000

CMD python3 app.py
As you can see it created a full fledged Dockerfile with the following best practices.
- Added a minimal base image.
- It added a non-priveleged user for security best practice.
- It added cache directory for speeding up subsequent installs by avoiding unnecessary downloads.
Without making any changes to the generated Dockerfile, I ran the docker build command and it worked perfectly fine.
docker build -t flask-app:1.0 .It built a image of size 161MB. Then I ran the SlimtoolKit on the build image and the image size reduced to 25MB.
I verified it the image is working as expected by deploying the image and it worked perfectly fine.
docker run -d -p 8000:8000 flask-app:1.0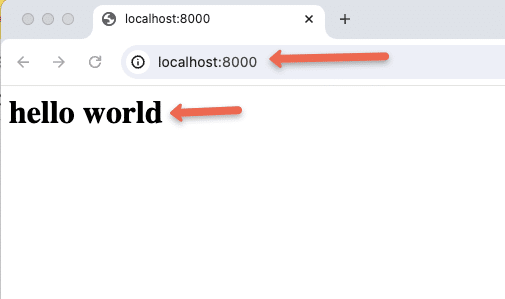
Also, if you are are Docker compose user, you can directly use the following compose command to build and run the image using the generated compose.yaml file.
docker compose up --buildFor demonstration purposes, we haven’t made any customizations to the Dockerfile. When working on real-world projects, you will need to use approved container-based images and add other required instructions such as proxies, etc., based on your organization’s standards.
Generating Go Dockerfile
For this example, we are going to dockerize a Go web application using docker init.
Create a file app.go, and copy the below content into the files
package main

import (
    "fmt"
    "net/http"
)

func helloHandler(w http.ResponseWriter, r *http.Request) {
    fmt.Fprintf(w, "Hello, World!")
}

func main() {
    http.HandleFunc("/", helloHandler)
    fmt.Println("Server listening on port 8080")
    http.ListenAndServe(":8080", nil)
}
Then run the below command in the same directory as the Go file, which will create a module file for the Go application.
Same as the above Python example without the module file, docker init will not automatically detect the language.
go mod init appThis will create a go.mod file that has the dependencies to run the Go web application.
#app.go

module app

go 1.22.2
Once both files have been created, run the below init command in the same directory where the files are to start the process
docker initDocker init will check your files and ask some questions for conformation as given below
You can see it has automatically detected a Go based application
Press ENTER to select Go and it will ask for the Go version, relative directory, listening port to run the app as shown below
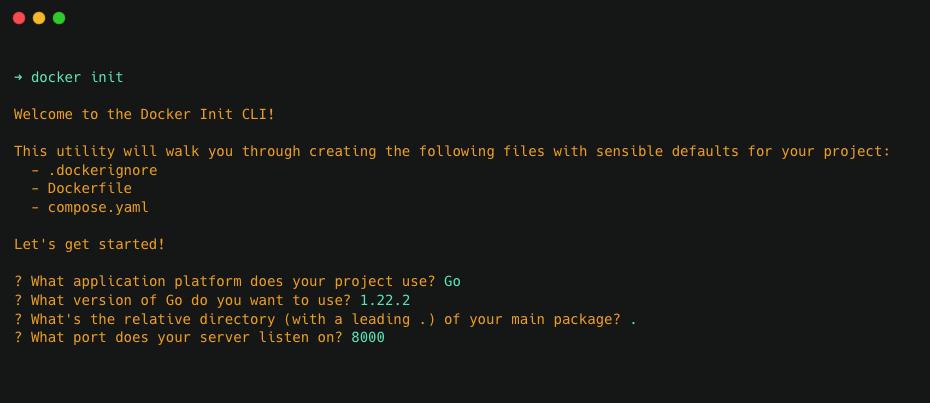
Once you have answered all confirmation questions docker init will create three files .dockerignore, compose.yaml, and Dockerfile as shown in the below directory structure
.
├── Dockerfile
├── app.go
├── .dockerignore
├── compose.yaml
└── go.mod
Your Dockerfile be created as shown below
ARG GO_VERSION=1.22.2
FROM golang:${GO_VERSION} AS build
WORKDIR /src
RUN --mount=type=cache,target=/go/pkg/mod/ \
    --mount=type=bind,source=go.sum,target=go.sum \
    --mount=type=bind,source=go.mod,target=go.mod \
    go mod download -x
RUN --mount=type=cache,target=/go/pkg/mod/ \
    --mount=type=bind,target=. \
    CGO_ENABLED=0 go build -o /bin/server .
FROM alpine:latest AS final
RUN --mount=type=cache,target=/var/cache/apk \
    apk --update add \
        ca-certificates \
        tzdata \
        && \
        update-ca-certificates
ARG UID=10001
RUN adduser \
    --disabled-password \
    --gecos "" \
    --home "/nonexistent" \
    --shell "/sbin/nologin" \
    --no-create-home \
    --uid "${UID}" \
    appuser
USER appuser
COPY --from=build /bin/server /bin/
EXPOSE 8000
ENTRYPOINT [ "/bin/server" ]
You can see the Dockerfile is created with every best practice to create a Docker Image more securely.
Also, you can compare the Go Dockerfile created by docker init is similar to the Python Dockerfile in the above example.
Furthermore, customize the Dockerfile based on your requirements and use it to Dockerize the Go web application.
Advantages of using docker init
Following are the advantages for using docker init.
- Creates Dockerfile, compose.yaml, and .dockerignore in an instance, thus saving time taken to write these files.
- Creates Dockerfile with best practices to make the Docker image more secure.
- Creates Dockerfile and compose.yaml with an explanation and instruction of what each line does, even a beginner could understand what’s on the Dockerfile.
- It will be helpful for beginners to create and understand Dockerfile with ease.
- Docker init creates a Dockerfile to make the Docker Image as light as possible.
Conclusion
In this blog, you learned about docker init, that eases dockerize process of your applications.
Also, we have gone through examples on how to create Dockerfile, compose.yaml, and .dockerignore files based on the language of the application.
I believe this blog gives you good information about the docker init utility and how to use it.
Give it a try and you will love it.
Also, how are you creating Dockerfiles in your current projects?
Share your process in the comment section.